Every mobile user in the Philippines now has to complete Smart SIM registration under Republic Act 11934, the SIM Registration Act. Whether you’re activating a brand-new TNT prepaid line or switching over an old Smart number, this rule applies to you. The good news is that Smart has made the process fairly painless — you can finish it through the official web portal, the GigaLife app, a QR code, or by calling the helpline, all without paying a single peso.
This guide walks through everything you need to know about Smart SIM registration: why it matters, what documents to prepare, how to register step by step, how to check your registration status, and how to fix the most common errors people run into along the way.
If you’re looking for more step-by-step guides on Philippine government services and online portals, visit RegisterInfoPH for the latest tutorials and updates.
What Does Smart SIM Registration Actually Mean?
Smart SIM registration is the process required by Philippine law that links every SIM card to a verified identity. Instead of buying a SIM and using it anonymously, the telecom operator now records who owns each number, tying it to a real name, a valid ID, and a live photo for verification.
The requirement covers new and existing subscribers alike, and it applies whether you’re on prepaid, postpaid, or a special category such as a minor, a person with disability, or a foreign national. Because the rule comes from national legislation, there’s no way around it — an unregistered SIM will eventually be deactivated.
Uninterrupted TNT and Smart services
Once you’re registered, you keep making calls, sending texts, and using mobile data exactly as before — registration doesn’t change your plan or usage.
A more accountable digital community
Registering your number is a small act that supports a safer, more trustworthy telecom network for everyone in the Philippines.
Why SIM Card Registration Matters for Everyone
SIM registration isn’t just red tape — it’s meant to close a security gap that scammers and fraudsters have exploited for years through anonymous, untraceable numbers.
Stronger digital security
Verified accounts make it far harder for criminals to hide behind a burner SIM, which in turn gives law enforcement a real trail to follow when suspicious activity is reported.
Fewer scams and less fraud
Text scams, phishing attempts, and financial fraud typically rely on numbers nobody can trace. A registered SIM database takes that anonymity away.
What You’ll Need Before You Start
Before opening the registration form, gather the following so the process goes smoothly on the first try.
Personal Details to Prepare
- Full legal name
- Mobile number and SIM serial number
- Date of birth
- Current home address
- A valid government-issued ID
- A live selfie photo for identity verification
Documents Required by User Type
Every applicant needs to submit personal information along with a selfie and a matching ID. On top of that:
- Minors under 18 need a parent or legal guardian’s ID on file.
- Foreign nationals and tourists need to present a valid passport and relevant travel documents.
Postpaid subscribers get an easier path — since Smart already has their details on record, there’s no need to re-upload documents. They simply confirm their registration.
Accepted IDs for Smart SIM Registration
Smart accepts a wide range of IDs for verification, as long as the document is valid and shows a clear photo. Acceptable IDs include:
- Citizen’s ID card
- Passport
- Driver’s license
- Voter’s ID
- Philippine National ID (PhilSys ID)
- Police clearance
- SSS ID
- PWD ID
- GSIS e-Card
- PhilHealth ID
- NBI clearance
- PRC ID
- BIR ID
- OWWA ID
- UMID
- Firearm license
- Any other government-issued photo ID
Any of these will work, provided it’s unexpired and the photo is clear.verification without any issues.
Which IDs Are Accepted?
Any valid, unexpired government-issued ID with a clear photo will generally work for Filipino citizens. The image needs to be readable and undamaged, since a blurry or expired ID is one of the most common reasons registrations get rejected. Minors register under a parent’s or guardian’s ID, while foreign nationals rely on their passport for verification.
How to Register Your Smart SIM (Step by Step)
Smart offers several registration routes, so you can pick whichever fits your situation best.
Option 1: Register Online Through the Smart Web Portal
The official Smart SIM registration link is available at smart.com.ph. Here’s how the online SIM registration process works:
- Go to the portal and click Register Your SIM Now.
- Enter your complete mobile number and tick the box confirming you agree to the terms and conditions.
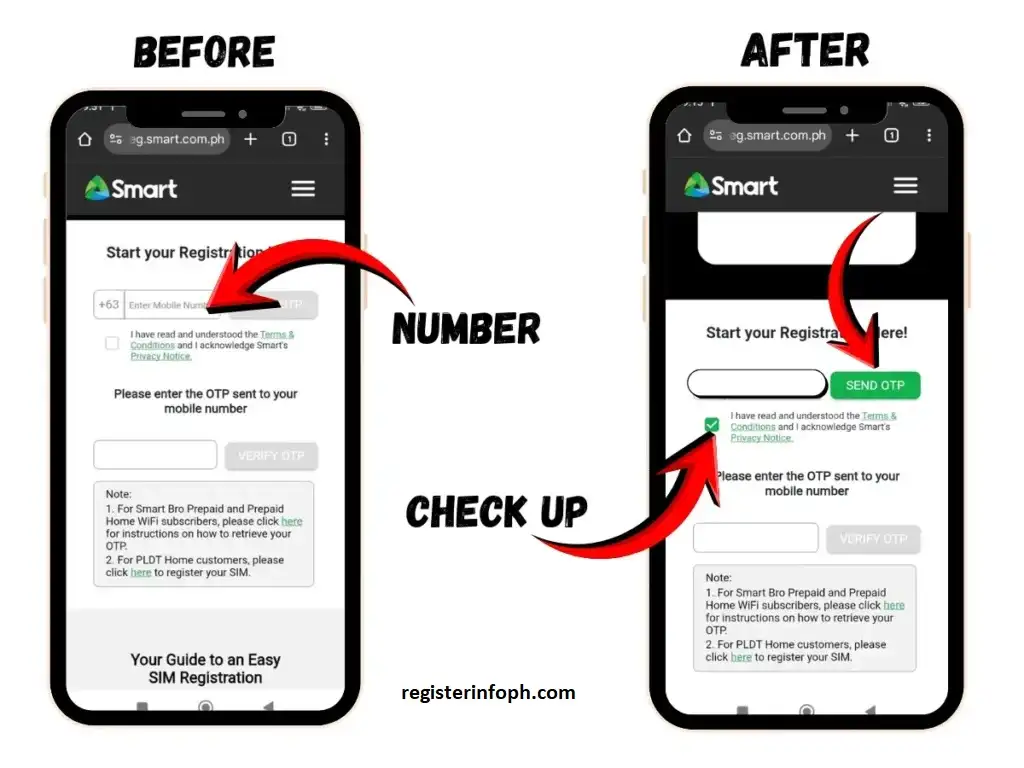
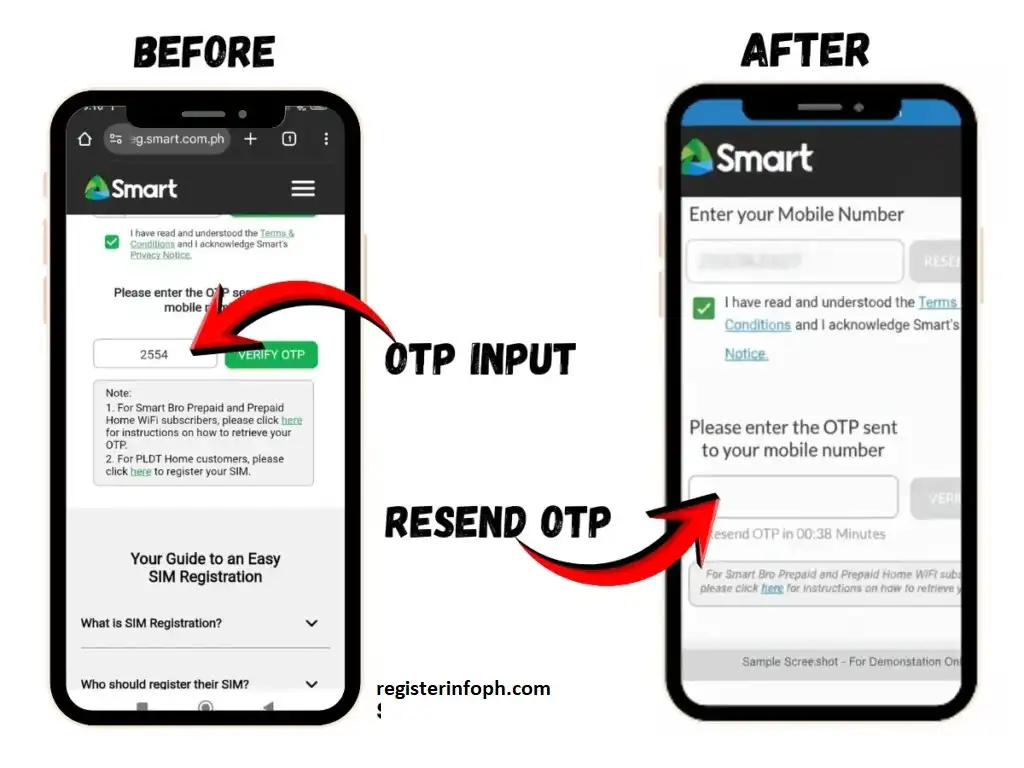
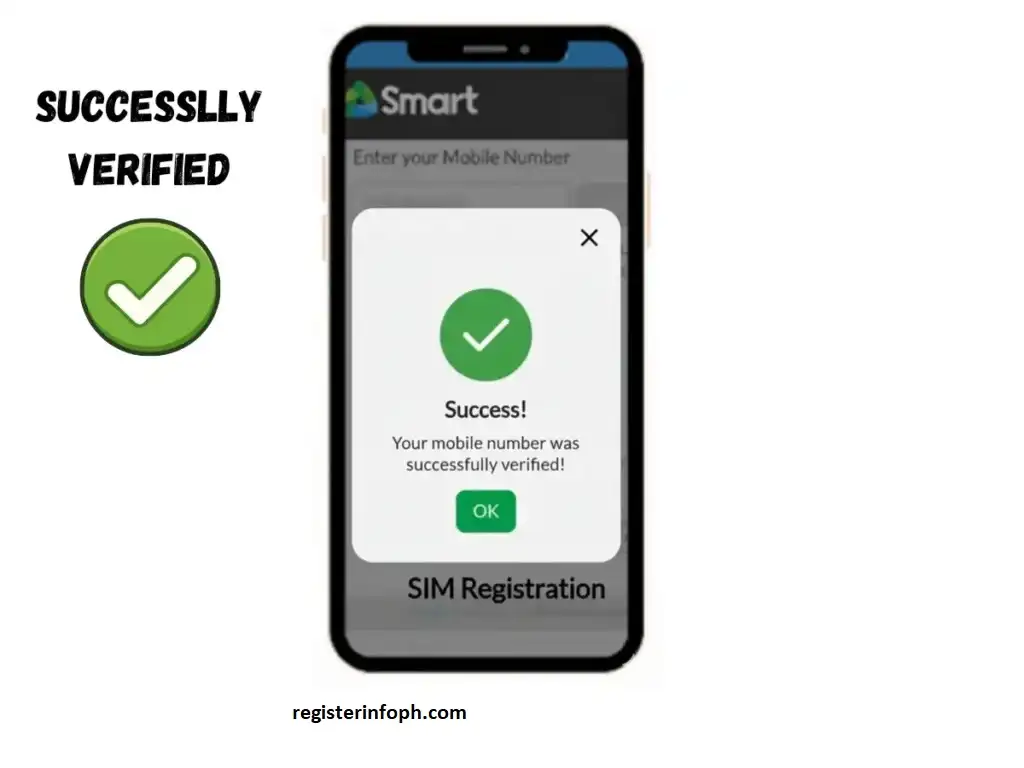
3. Tap Send OTP, then enter the one-time code once it arrives to verify your number.
4. After verification, fill in your personal details.
5.Select your nationality, choose your ID type, and upload a clear photo of that ID.
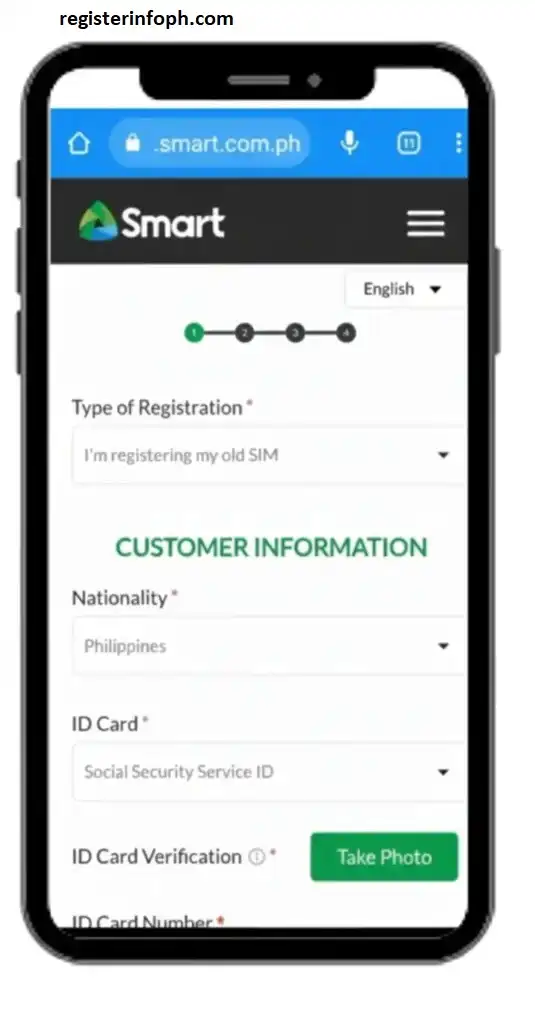
6. Enter your registration type and personal details exactly as they appear on your ID — full name, ID number, birthdate, and gender.

7. Add your address and an alternate contact number, then move to the next screen.

8. Review everything carefully, confirm it’s accurate, and submit.
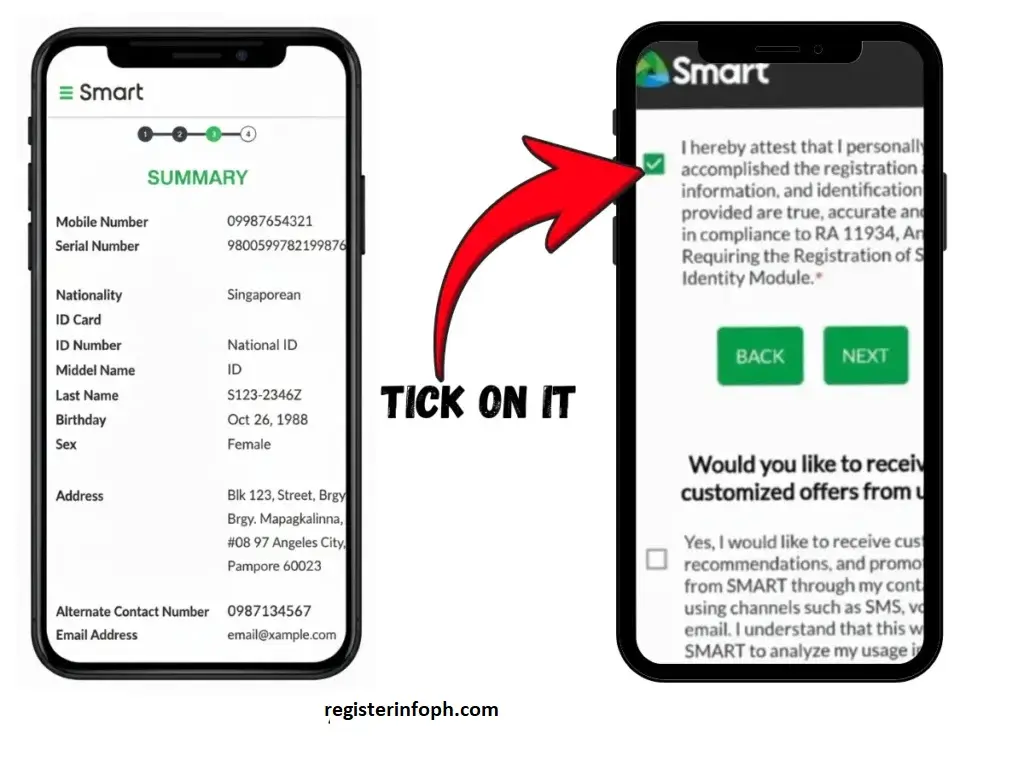
9. You’ll receive a confirmation screen with a control number, and an SMS will follow once your SIM is officially active.

Option 2: Register via QR Code
Scanning the SIM registration QR code takes you straight to the same online portal, skipping a few navigation steps. From there, the process matches the web portal instructions above.
Option 3: Register Through the GigaLife App
The GigaLife app mirrors the web registration flow with a slightly more mobile-friendly layout:
- Download and open the GigaLife app.
- Enter your mobile number, then request and verify your OTP.
- Upload your personal information and a valid ID, and complete a quick face-verification selfie.
- Fill out the rest of the registration form and confirm submission.
- You’re set — the app also becomes your go-to place for checking balances, points, and subscriptions going forward.
Option 4: Register by Phone Call (Postpaid Only)
Call-based registration is reserved for postpaid subscribers; TNT prepaid users can’t register this way. Postpaid customers can use the same call channel to register, renew, or switch packages.
- New postpaid lines are typically registered automatically once the number is verified online — no extra paperwork needed.
- Existing postpaid renewals just require texting “YES” to 5858 and following the callback instructions that come through.
Option 5: Register In Person at a Smart Store
Walking into a physical Smart store lets a staff member guide you through registration face-to-face, which can be reassuring if you’d rather not do it digitally. Bring your ID and be ready for possible lines during peak hours.
Option 6: Register via the Smart Hotline
Postpaid users can also register by dialing 5858 and following the prompts — a fast option if you’re already a verified postpaid customer.
How Long Does SIM Activation Take?
Most registrations activate within a few hours, though Smart allows up to 24 hours for full processing. If your line is still inactive after that window, contact the helpline for support.
Read Also : LTMS Portal: Complete Registration Guide & Requirements (2026)
How to Check Your Smart SIM Registration Status
Not sure if your registration went through? There are two easy ways to confirm it.
Through the Smart SIM Registration Portal:
- Log in using your registered mobile number.
- Click Verify Registration.
- A confirmation pop-up will show whether your number is registered.
Through the GigaLife App:
- Log in with your registered number.
- Your dashboard will display your registration status along with your loyalty points and active subscriptions.
Rewards and Freebies After Registering
Registering isn’t just a legal requirement — Smart sweetens the deal with a few perks depending on your plan type.
- Prepaid users can enjoy free calls, texts, and bonus mobile data.
- Postpaid users get monthly data and call perks bundled into their plan.
- Family plans let you share calls, texts, and data across multiple registered members.
- Smart Home WiFi subscribers may receive unlimited data at a discounted rate.
Registration itself doesn’t cost anything, and many new users also get around 3GB of bonus roaming data automatically credited once their SIM is verified.
Tips for a Smooth Smart SIM Registration Process
Fixing Common Smart SIM Registration Errors
Running into a glitch mid-registration is common — here’s how to troubleshoot the most frequent ones.
OTP not arriving. This usually comes down to network congestion or an unstable connection. Wait a moment, then tap resend, and make sure your signal is strong before retrying.
Blurry or rejected ID photo. Upload a sharp, well-lit image under 2MB, making sure your signature and photo are clearly visible on the card.
Selfie or camera not working. Check that your browser or app has camera permission enabled, and confirm your device’s camera isn’t being blocked by another app.
Portal won’t load. Heavy traffic on Smart’s servers can slow the page down — switching to a more stable connection or trying again during off-peak hours usually resolves it.
“SIM already registered” error. This typically means the number is still linked to a previous owner in Smart’s system. Contact the helpline so they can release and reassign it to you.
App keeps crashing. Update to the latest version of GigaLife, free up storage on your device, and try registering during lower-traffic hours.
Smart SIM Registration Support and Helpline
If you get stuck at any point, Smart’s support team can help directly:
Smart Hotline: *888 (for Smart and TNT mobile numbers)
Landline: (02) 8888-1111
Official Registration Portal: simreg.smart.com.ph
Email Support: [email protected]
Frequently Asked Questions
Conclusion
Smart SIM registration might feel like one more form to fill out, but it takes only a few minutes and comes with real benefits — safer transactions, fewer scam calls, and uninterrupted access to your calls, texts, and data. Whether you register through the web portal, the GigaLife app, a QR code, or in person at a Smart store, the steps are straightforward as long as you have a valid ID and accurate personal details ready. Complete your registration early, keep your confirmation details on hand, and you’ll avoid any last-minute disruption to your line while doing your part for a more secure telecom network in the Philippines.
Explore our latest posts to discover more guides on SIM registration, government services, and online portals.